Standing in front of the Eiffel Tower with hundreds of tourists jostling for position, you might wonder if it’s even possible to capture something original. The good news? It absolutely is. Learning how to photograph landmarks transforms generic snapshots into compelling images that tell your unique story. Whether you’re shooting the Taj Mahal at sunrise or the Golden Gate Bridge in fog, specific techniques separate memorable photos from forgettable ones.
Photographing landmarks successfully requires understanding composition fundamentals, timing your visit for optimal light, and choosing camera settings that match your creative vision. The best landmark photos combine technical precision with unique perspectives that move beyond typical tourist shots. Practice these techniques consistently, and you’ll develop an eye for transforming famous monuments into striking images that capture both the structure’s grandeur and your personal interpretation of the scene.
Understanding Light Makes or Breaks Your Shots
Light determines everything in photography. The harsh midday sun that most tourists photograph under creates flat, lifeless images with blown-out highlights and dark shadows.
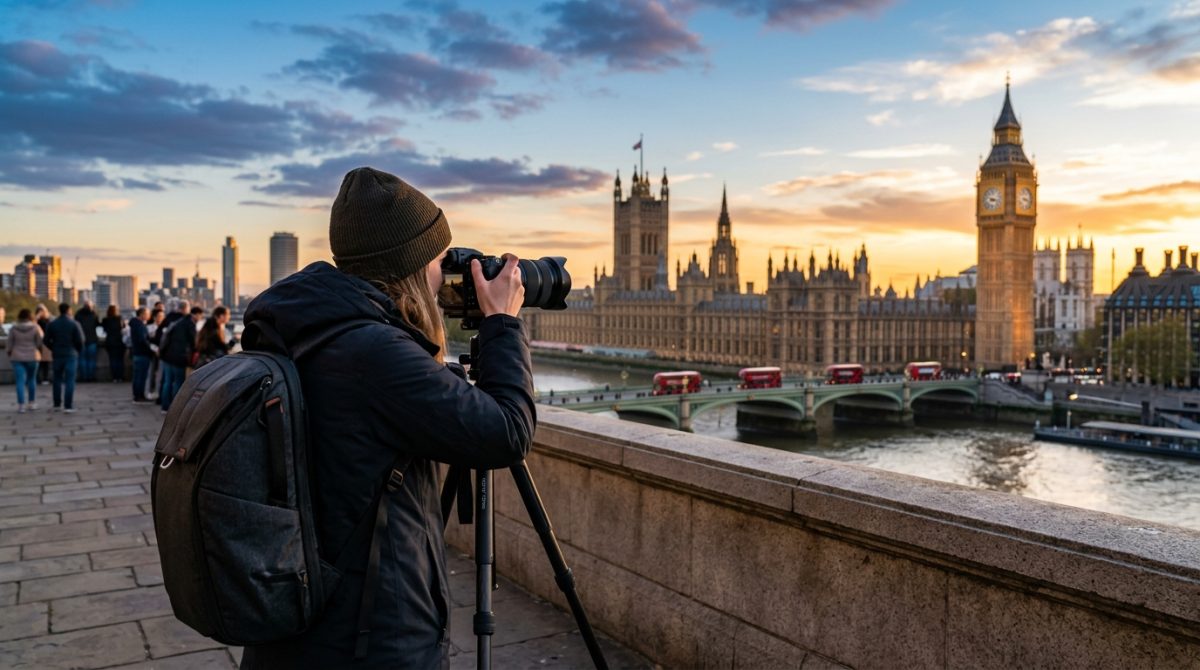
Golden hour, the period just after sunrise and before sunset, bathes landmarks in warm, directional light that adds depth and drama. The Colosseum looks entirely different at 7 AM compared to noon. Shadows become sculptural elements rather than problems.
Blue hour, the twilight period before sunrise and after sunset, offers another magical window. City landmarks with illumination shine against deep blue skies, creating balanced exposures between ambient light and artificial lighting.
Overcast days work beautifully for certain landmarks. Diffused light eliminates harsh shadows and creates even exposures across architectural details. Gothic cathedrals and intricate facades often photograph better under clouds than bright sun.
The difference between an amateur and professional landmark photo often comes down to patience. Waiting two hours for the right light transforms a decent photo into an exceptional one.
Weather conditions add character. Fog wrapping around San Francisco’s Golden Gate Bridge creates atmosphere impossible to achieve in clear conditions. Rain-slicked streets reflect monument lights, doubling visual impact.
Composition Techniques That Create Impact
The rule of thirds remains fundamental. Placing your landmark at intersection points rather than dead center creates natural balance and visual interest.
Leading lines guide viewers into your frame. Roads, rivers, pathways, and architectural elements all serve as compositional tools that direct attention toward your main subject.
Foreground elements add depth and context. A fountain, statue, or garden in the foreground creates layers that make two-dimensional photos feel three-dimensional. The Washington Monument photographed through cherry blossoms tells a richer story than the monument alone.
Framing within frames adds sophistication. Archways, doorways, windows, and tree branches create natural borders that focus attention on your landmark while adding compositional complexity.
Symmetry works powerfully for certain monuments. The Taj Mahal’s perfect symmetry almost demands centered composition. Breaking conventional rules makes sense when the subject itself is symmetrical.
Changing your perspective transforms familiar landmarks:
- Shoot from ground level looking up to emphasize height and grandeur
- Find elevated viewpoints for unique angles most tourists never see
- Get close to highlight architectural details and textures
- Step back to show context and surrounding environment
- Shoot through objects to create depth and mystery
Camera Settings for Architectural Excellence
Aperture controls depth of field and sharpness. For sweeping landmark shots where everything needs focus, use f/8 to f/11. These apertures provide excellent sharpness across the entire frame while maintaining manageable shutter speeds.
For isolating specific architectural details against blurred backgrounds, open up to f/2.8 or f/4. This technique works beautifully for ornate doorways, sculptures, or decorative elements.
Shutter speed depends on your creative intent and available light. Handheld shooting typically requires 1/125s or faster to avoid blur. When using tripods during blue hour or night photography, slower speeds like 1/4s to several seconds create light trails and smooth water.
ISO should stay as low as possible for maximum image quality. Modern cameras handle ISO 800 or 1600 reasonably well, but ISO 100 or 200 produces the cleanest files with the most detail for printing or cropping.
| Scenario | Aperture | Shutter Speed | ISO | Notes |
|---|---|---|---|---|
| Bright daylight, full scene | f/8 to f/11 | 1/250s or faster | 100 to 200 | Maximum sharpness throughout |
| Golden hour, full scene | f/8 | 1/125s to 1/250s | 200 to 400 | Watch for motion blur |
| Blue hour with tripod | f/8 to f/11 | 1s to 30s | 100 to 200 | Use remote shutter release |
| Interior details | f/4 to f/5.6 | 1/60s to 1/125s | 800 to 1600 | May need higher ISO |
| Night photography | f/8 | 2s to 20s | 100 to 400 | Tripod essential |
Shooting in RAW format gives maximum flexibility during editing. JPEG files bake settings into the image, limiting your ability to recover highlights or adjust white balance later.
White balance affects mood dramatically. Auto white balance works for most situations, but manually setting it creates consistent color across a series. Daylight setting (5500K) works for golden hour warmth, while cloudy setting (6500K) adds warmth to overcast days.
Planning Your Landmark Photography Session

Research before arriving saves time and frustration. Study other photographers’ work to identify promising angles and viewpoints. Google Maps satellite view reveals potential shooting locations around your landmark.
Timing your visit strategically avoids crowds. Weekday mornings typically have fewer tourists than weekend afternoons. Summer vacation periods bring maximum crowds to popular monuments.
Checking sunrise and sunset times helps you arrive early enough to set up and compose shots before optimal light arrives. Photographers often arrive 45 minutes before golden hour begins.
Scouting locations the day before your planned shoot identifies obstacles, interesting angles, and composition possibilities without pressure. You’ll shoot more confidently when you’ve already visualized your images.
Permission and restrictions matter. Some landmarks prohibit tripods or commercial photography. Research rules beforehand to avoid confiscation or fines.
Consider these practical preparation steps:
- Check weather forecasts three days before your planned shoot
- Identify backup shooting locations if weather turns unfavorable
- Charge all batteries and clear memory cards the night before
- Pack appropriate lenses based on your planned compositions
- Bring a tripod even if you think you won’t need it
- Download offline maps in case cell service is unreliable
Working Around Crowds and Obstacles
Patience solves most crowd problems. Waiting for gaps in tourist flow takes time but produces clean compositions impossible during peak congestion.
Longer exposures blur moving people into ghostly transparency or eliminate them entirely. A 30-second exposure at a busy landmark often shows an empty scene as moving tourists don’t register on the sensor.
Including people intentionally adds scale and life. A solitary figure gazing at a monument creates narrative and helps viewers understand the structure’s size.
Shooting from unusual angles avoids typical tourist viewpoints where crowds concentrate. That side alley or adjacent building might offer cleaner sight lines.
Early morning and late evening naturally reduce crowds. The 6 AM version of most landmarks looks dramatically different from the 2 PM version.
Focal length affects how crowds appear. Telephoto lenses compress perspective and make crowds look denser. Wide-angle lenses from closer positions minimize background clutter.
Post-Processing Strategies for Landmark Photos
Straightening vertical lines prevents that tilted, falling-backward look common in architectural photography. Most editing software includes perspective correction tools that fix converging verticals.
Adjusting exposure and contrast brings out details lost in shadows or highlights. The histogram guides these adjustments, showing whether you’re clipping important information.
Enhancing colors selectively makes landmarks pop without looking oversaturated. Vibrance increases muted colors while protecting already-saturated tones from becoming garish.
Removing distractions keeps focus on your landmark. The spot healing tool eliminates trash cans, signs, and other modern intrusions that break historical atmosphere.
Sharpening should be your final step. Apply it judiciously to architectural details while avoiding over-sharpening that creates halos and artifacts.
Black and white conversion works beautifully for many landmarks. Removing color emphasizes form, texture, and light. Classical architecture often looks timeless in monochrome.
Common Mistakes That Weaken Landmark Photos
Shooting only the obvious angle produces images identical to millions of others. The postcard view has been captured perfectly already. Your job is finding something different.
Ignoring foreground and background creates flat, contextless images. Landmarks exist within environments. Show that relationship.
Centering everything creates static, boring compositions. Off-center placement adds tension and visual interest.
Forgetting about scale leaves viewers unable to judge size. Including recognizable elements like people, cars, or trees provides scale reference.
Over-editing destroys credibility. HDR processing pushed too far creates surreal, unnatural images that look fake. Subtlety preserves authenticity.
Shooting only in perfect weather misses atmospheric opportunities. Storms, fog, and unusual conditions create dramatic images that stand out from typical sunny-day shots.
Equipment Considerations for Different Situations
Wide-angle lenses (16mm to 35mm) capture entire structures and surrounding context. They’re essential for photographing large monuments or shooting in confined spaces.
Standard lenses (35mm to 70mm) provide natural perspective similar to human vision. They work well for medium-distance shots and general landmark photography.
Telephoto lenses (70mm to 200mm+) isolate details and compress perspective. Use them for highlighting architectural elements, sculptures, or distant landmarks.
Tripods enable long exposures, panoramas, and precise composition. Carbon fiber models balance stability with portability for travel photography.
Filters still matter in digital photography. Polarizing filters reduce reflections and deepen blue skies. Neutral density filters allow long exposures in bright conditions.
Your smartphone can produce excellent landmark photos with proper technique. The best camera is the one you have with you. Master composition and light first, then upgrade equipment.
Developing Your Unique Perspective
Studying master photographers reveals how they approach familiar subjects differently. Analyze what makes their landmark photos compelling beyond technical execution.
Shooting the same landmark multiple times builds understanding. Each visit teaches you something new about light, angles, and timing.
Experimenting with creative techniques keeps your work fresh. Try intentional camera movement, multiple exposures, or unusual color grading.
Thinking beyond documentation means asking what story you want to tell. Is it about the landmark’s history, its relationship to modern life, or your personal experience visiting it?
Your perspective matters more than your equipment. Two photographers with identical cameras at the same landmark will produce different images based on their vision and choices.
Making Your Landmark Photos Shine
The techniques covered here work whether you’re photographing the Statue of Liberty or a local historic building. Understanding light, composition, and camera settings forms your foundation. Adding planning, patience, and personal vision transforms technical knowledge into compelling images.
Start with one landmark near you. Visit it at different times of day and in various weather conditions. Practice these techniques until they become intuitive rather than mechanical. Your improvement will show not just in better photos, but in your ability to see photographic opportunities others miss. The monument hasn’t changed, but your ability to capture it beautifully has.